 Save to Pinterest
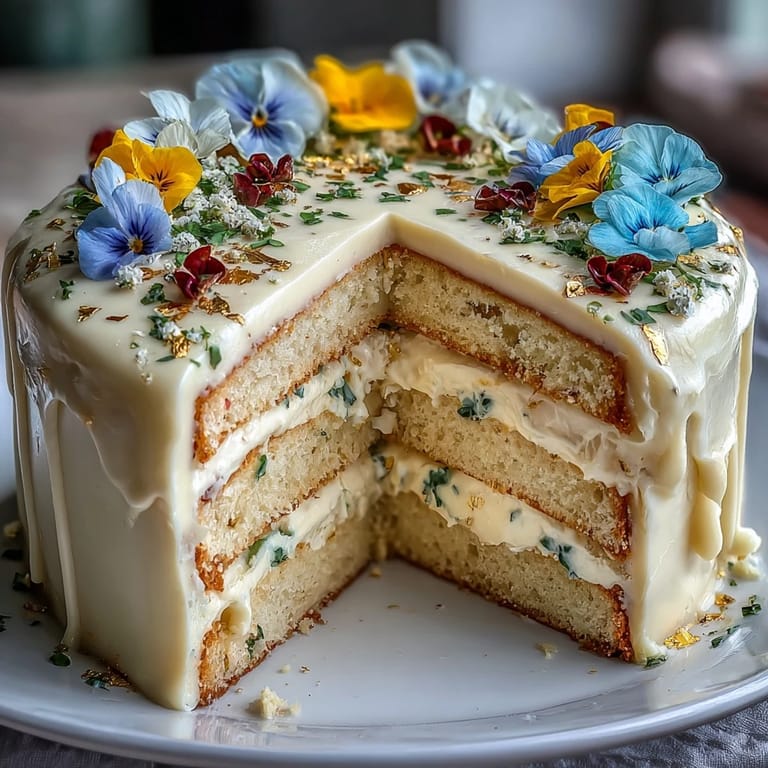
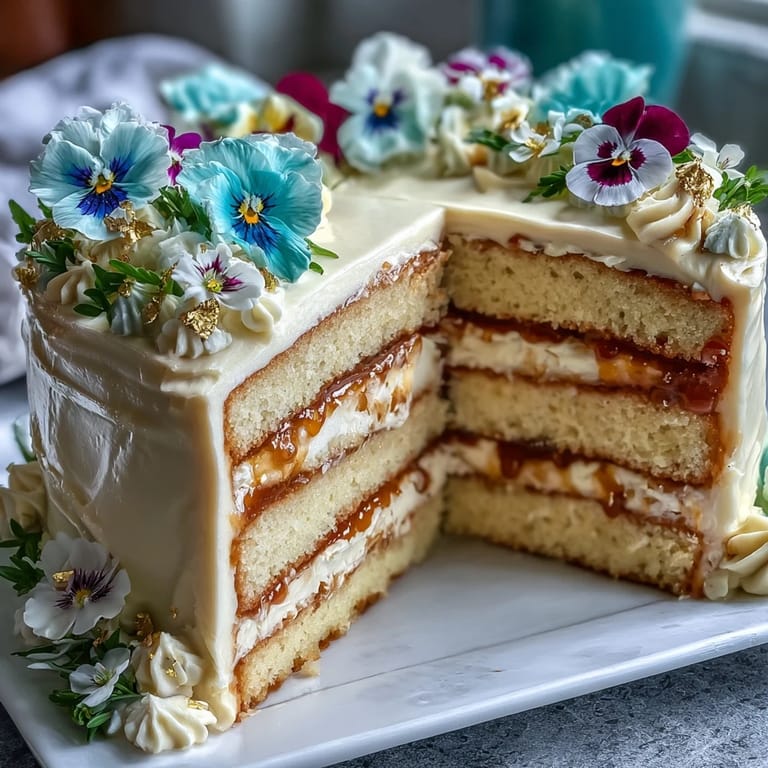
 My cousin's graduation morning started with a text: could I make something special for her party that afternoon? I stood in my kitchen thinking about what would feel worthy of that milestone, and somehow I kept circling back to the image of a cake draped in gold and flowers—something that looked like it belonged in a fancy gallery, not just on a dessert table. That's when I decided to tackle Swiss meringue buttercream for the first time, and honestly, the moment those glossy peaks formed in my mixer, I knew this cake would be the kind people remember.
I'll never forget watching my cousin's face when she saw it sitting on the table at her party—she literally gasped, and then everyone else did too. One guest asked if I'd hired a professional baker, and I caught myself grinning like I'd just pulled off the heist of the century. What struck me most was that this wasn't just a cake anymore; it was a centerpiece, a conversation starter, a little edible work of art that somehow made the whole celebration feel more ceremonial.
Ingredients
- All-purpose flour (2 1/2 cups): The foundation of your sponge, and keeping it measured correctly ensures the cake rises evenly without becoming dense or too crumbly.
- Baking powder (2 1/2 tsp): This is your lift—don't skip it or reduce it, or you'll end up with a disappointingly flat cake.
- Unsalted butter (1 cup for cake, 1 1/2 cups for buttercream): Room temperature is non-negotiable; cold butter won't cream properly and you'll lose that light, fluffy texture.
- Granulated sugar (2 cups for cake, 1 1/4 cups for buttercream): The sugar in the buttercream needs to fully dissolve over heat, or you'll have a gritty, unpleasant texture.
- Large eggs (4 for cake, 5 for buttercream): Room temperature eggs blend more smoothly and create a more uniform batter and meringue.
- Vanilla extract (1 tbsp for cake, 2 tsp for buttercream): Good quality vanilla makes a real difference; cheap stuff tastes slightly off and won't carry the flavor through the richness of the buttercream.
- Whole milk (1 cup): The moisture that keeps your sponge tender and prevents it from drying out, especially important when you're stacking three layers.
- Edible gold leaf: Buy actual gold leaf, not imitation; it adheres better and looks more luminous under light.
- Edible flowers: Source these from specialty grocery stores or online retailers that guarantee they're pesticide-free; farmers market flowers are often treated with chemicals.
Tired of Takeout? 🥡
Get 10 meals you can make faster than delivery arrives. Seriously.
One email. No spam. Unsubscribe anytime.
Instructions
- Prepare your pans and preheat:
- Get your oven to 350°F and have three 8-inch pans lined with parchment paper—this prevents sticking and makes turning out the layers way less stressful. I learned the hard way that skipping the parchment paper is a recipe for cake fragments.
- Mix the dry ingredients:
- Whisk flour, baking powder, and salt together in a bowl; this aerates the flour and distributes the leavening evenly. Set it aside so you're not scrambling when you need it.
- Cream butter and sugar:
- Beat them together for about 3 minutes until the mixture is pale, fluffy, and looks almost mousse-like; this incorporates air that helps the cake rise and become tender. The sound of the mixer changes when you've creamed it enough—it gets lighter and fluffier sounding.
- Add eggs one at a time:
- Drop each egg in individually and beat well after each addition; this prevents the batter from looking curdled or separated. It takes a little patience, but it makes a genuine difference in texture.
- Incorporate vanilla and alternate wet and dry:
- Add vanilla, then alternate adding the flour mixture and milk, starting and ending with flour, mixing just until you don't see streaks of white anymore. Over-mixing develops gluten, which makes the cake tough—you want tender, almost delicate crumbs.
- Divide and bake:
- Split the batter evenly among your three pans and smooth the tops with a spatula. Bake for 28–32 minutes; the cakes are done when a toothpick inserted in the center comes out clean, not with wet batter clinging to it.
- Cool with patience:
- Let the cakes sit in their pans for 10 minutes so they firm up enough to turn out without breaking, then flip them onto wire racks to cool completely. Don't rush this—a warm cake is fragile and will crumble.
- Make the Swiss meringue buttercream:
- Combine egg whites and sugar in a heatproof bowl over simmering water and whisk constantly for about 5 minutes until the mixture is hot (160°F) and the sugar is completely dissolved. This pasteurizes the eggs and creates a stable base.
- Whip the meringue:
- Transfer to a stand mixer and beat on high speed for 8–10 minutes until stiff peaks form and the bowl feels cool to the touch; the meringue will go from glossy and pillowy to a bit dull, which means it's ready. This is where the magic happens—the meringue triples in volume and becomes incredibly stable.
- Add butter gradually:
- Reduce speed to medium and add butter a few cubes at a time, allowing each addition to fully blend before adding more. The buttercream might look a little broken or curdled momentarily, but keep mixing and it will come together into silky perfection.
- Season and finish:
- Mix in vanilla extract and a pinch of salt; the salt enhances the vanilla flavor and prevents the buttercream from tasting one-dimensionally sweet.
- Assemble the cake:
- Place the first cake layer on your serving plate, spread a generous layer of buttercream on top, then repeat with the second layer and buttercream. Top with the third layer and apply a thin crumb coat, chill for 20 minutes to seal in any crumbs, then spread the final smooth layer of buttercream.
- Apply gold leaf decoratively:
- Use a food-safe paintbrush to gently press small pieces of gold leaf onto sections of the frosted cake; it sticks surprisingly well and catches light beautifully. Work in small sections and let each piece settle before moving to the next.
- Arrange edible flowers and finishing touches:
- Place edible flowers around the cake in clusters or scattered patterns, depending on the look you want—I typically group them where the gold leaf ends. Add a gold ribbon around the base if you like, and step back to admire your handiwork.
 Save to Pinterest
 What moved me most was realizing that a cake could be more than sustenance; it could be a tiny piece of art that celebrates someone's hard work and dedication. Every time someone took a photo of it before cutting into it, I felt like I'd created something that mattered.
Why Room Temperature Ingredients Matter
I used to think room temperature was just baker's perfectionism, but it genuinely changes the outcome—cold butter won't incorporate air properly, cold eggs won't emulsify smoothly, and cold milk will make the batter seize up and separate. Let your ingredients sit on the counter for about an hour before you start, or if you're in a rush, cut butter into smaller pieces and set eggs in warm water for a few minutes. It sounds fussy, but those 10 extra minutes of prep time translate into a visibly better crumb structure and a more reliable rise.
Decorating with Gold Leaf and Flowers
Gold leaf seems intimidating until you realize it basically wants to stick to the buttercream on its own—just breathe gently, use a dry paintbrush, and don't overthink it. I've found that applying the gold first, then arranging flowers around it, creates a more intentional-looking design than scattering everything at once. The flowers should feel placed, not random, even though the end result looks effortlessly elegant.
Timing and Make-Ahead Strategy
The beauty of this cake is that you can bake the layers a full day ahead and store them wrapped tightly at room temperature or in the fridge. Make the buttercream the morning of the event, assemble and decorate within a few hours of serving, and you'll have a restaurant-quality dessert without the last-minute stress. I always keep my fully decorated cake in a cool room rather than the fridge—cold buttercream looks a little matte, while room-temperature buttercream has a silkier, more luxurious sheen.
- Bake cake layers up to 24 hours ahead and store in an airtight container at room temperature.
- Make buttercream on the day of the event for the best texture and ease of spreading.
- Decorate the cake within 3–4 hours of serving so edible flowers stay fresh and vibrant.
 Save to Pinterest
 This cake taught me that celebration food doesn't have to be complicated to be memorable—it just needs intention and a little gold. Make it for someone you're proud of.
Common Questions
- → How do I make sure the buttercream is smooth?
Beat the meringue until stiff peaks form and the bowl feels cool, then add butter gradually while mixing on medium speed for a creamy texture.
- → Can I prepare the sponge layers ahead of time?
Yes, bake and cool the sponge layers fully, then wrap and store them in the fridge for up to two days before assembling.
- → What types of edible flowers work best?
Use pesticide-free edible flowers like pansies, violets, or roses to add natural beauty and subtle flavor.
- → How do I apply the gold leaf without tearing it?
Use a food-safe paintbrush gently to lift and place the gold leaf onto the buttercream surface carefully to avoid ripping.
- → Is there a variation for chocolate lovers?
Substitute half a cup of flour with cocoa powder in the sponge mix for a rich chocolate twist.